Monday, October 28, 2013

Jumping on the Pumpkin Bandwagon: Pumpkin Mac and Cheese with Caramelized Onions and Blue Cheese


When the calendar flipped to October 1, it was like my Facebook news feed virtually blew up with everything fall. It's something I like to salaciously refer to as a fall-gasm.  People exclaiming, "I LOVE FALL", and wearing sweaters and riding boots even though in most cases it was still about 75 degrees everywhere. By a show of hands, who has visited an apple orchard in the last week? And has taken pictures of fall foliage with the hashtag #nofilter? So yes. People love fall. Sadly, I'm not one of those people. I would say I like fall slightly less than most people.  First of all, I'm a spring baby and no one can convince me that fall trumps May 19th because it just don't. Also, my fall and winter wardrobe is the pits. Tights?! Arg. Also, I miss the beach and good smelling sunblock. But my biggest beef with fall is.....What is with all the pumpkin?! Once fall hits, suddenly pumpkin becomes injected into everything.  Pumpkin coffee, pumpkin lattes, pumpkin beer, pumpkin cider,pumpkin hot chocolate, pumpkin muffins, pumpkin bread, pumpkin hair gel. Hell, I'm surprised Colgate doesn't come out with  pumpkin toothpaste around Halloween every year. Maybe they do, and I'm just blocking it out.

Punching pumpkins like it's my bizness


So most years I'm all like, "Down with pumpkin" and I go on being the equivalent to The Grinch that Stole Christmas. Just call me the Gluten Free Grinch that Stole the Autumnal Equinox.   However, now that I'm doing this ole blog again, I decided what better time to release my demons and jump on the pumpkin bandwagon once and for all. If you can't beat them, join the pumpkin lovin' bonanza!!

Tossing and turning one night after a touch to late in the day cup of tea, I stumbled upon the idea for pumpkin macaroni and cheese. When I learned to make mac and cheese from scratch a few years back, it became one of 10 or so dishes on my rotating menu. I never get sick of it. It's easy and quick and it's always delicious.  You can find my original blog post on making classic mac and cheese, including step by step instructions on making the GF roux here. 

While pumpkin in itself isn't sweet, it seems as if most things that pumpkin ends up in are in fact sweet. I wanted to pair the pumpkin with a little savory sweet, which is why I went with the caramelized onion. I balanced that out by adding the crust of blue cheese. This is a pretty multi-step recipe, so I suggest saving this for a nice Saturday or Sunday afternoon cooking session.  You can light your autumn harvest candles, wear a bulky sweater, and have a fallgasm in the privacy of your own kitchen. 


Pumpkin Mac and Cheese with Caramelized Onions and Blue Cheese

Ingredients


Onion
Sugar
2 T butter
1 cup of water
salt and pepper

One pie pumpkin
Olive Oil
Salt and Pepper

3/4 bag of GF pasta

2 T butter
1 1/2 T GF flour
2 cups milk
garlic clove, smashed
1/2 cup shredded cheddar

4 oz or so blue cheese, crumbled

1. First up, roast your pumpkin.

I was able to buy a smallish size pie pumpkin from Trader Joe's for this recipe. Thank goodness because I was traveling by bus. Cut the handle portion and bottom off so it will lay flat on the counter. This way you can cut it in half without fear of impalement. Cut pumpkin in half and scrape out seeds.  Set seeds aside.  Sprinkle two halves of pumpkin with olive oil, salt, and pepper and place cut side down on a cookie sheet. Bake at 350 for 45 minutes or until pumpkin is nice and soft.  Remove from oven and let cool and then scrape out your pumpkin and mash it up.  Add a little salt and pepper and set aside.

Also, don't forget to bake your seeds! Remove all the guts from the seeds and sprinkle with salt. Place on a separate cookie sheet and you can bake them in the oven with the pumpkin for about 10 minutes.  Remove from oven and sprinkle with a bit more salt and set aside. 


2. Next, caramelize your onions.

You can do this way ahead of time and I suggest you do. Caramelizing onion takes awhile and like any good food it can't be rushed. However, I was able to find a small loophole in terms of onion caramelization that I will share with you to make this process a bit more bearable and fool proof. When I first attempted to make caramelized onions, I ran into a myriad of problems. My pan was too hot, the onions cooked too fast, the onions burned, the sugar burned. Bah. I nearly gave up. Instead of losing all hope, I learned of a technique that allows for essentially mess up proof onions.  I'm sure Julia Child is rolling in her grave but I'm sorry Jules. I just don't have your culinary prowess! Forgive me.

Sinfully adding water to my caramelized onions to speed them along


So, start by cutting onion into rings.  Add butter to a saucepan and turn heat to medium. Once butter is melted, add onions and stir.  Shake one t of sugar and a dash of salt and pepper onto onions. Stir to coat.  Keep heat at medium. After about a minute or once you start to see the onions start to stick to the pan, add a splash of water and stir.  Keep doing this every time you see the liquid decrease to levels where it looks like the onions will start to burn or stick to the pan. I also usually add a little salt, pepper, and a dash of sugar every now and then too.  Basically by adding the water, you're not only preventing the onions from overcooking too quickly, but you're making a little speedy sugar/water sauce that will coat the onion and keep everything a nice brown color.  Now this process will still take some time.  I would say a good 20 minutes or so of constant stirring and adding a little bit of water each time things start to stick. But once the onions are a good light brown color and they fall apart when you try to cut them with a fork, they are done. Remove from heat and put in a bowl to cool.


3. Make your pumpkin cheese sauce

Add butter to sauce pan and place heat at medium high.  Once butter melts, add flour and stir about 1 minute.  Add milk slowly, whisking as you pour it in. I've started to add a smashed garlic glove to my cream sauces. It adds a great dimension and pairs well with the pumpkin.  You can throw that in now if you'd like. Reduce heat to medium and keep whisking until sauce coats the back of a spoon. Add cheddar cheese and then taste. Add salt and pepper to season to your liking.  Next, add about 1 cup of your mashed up pumpkin that you roasted previously. Stir it all together and then set aside.

4. Boil pasta

5. Put it all together.  Once pasta is cooked and drained, add your pumpkin cheese sauce and stir.  Take the remainder of your pumpkin mash and carmelized onion and add it to the pasta.  Mix everything together and place in baking dish.  Top with crumbled blue cheese and place under the broiler for 3 minutes until blue cheese is nice and bubbling. Remove from oven and top with pumpkin seeds.

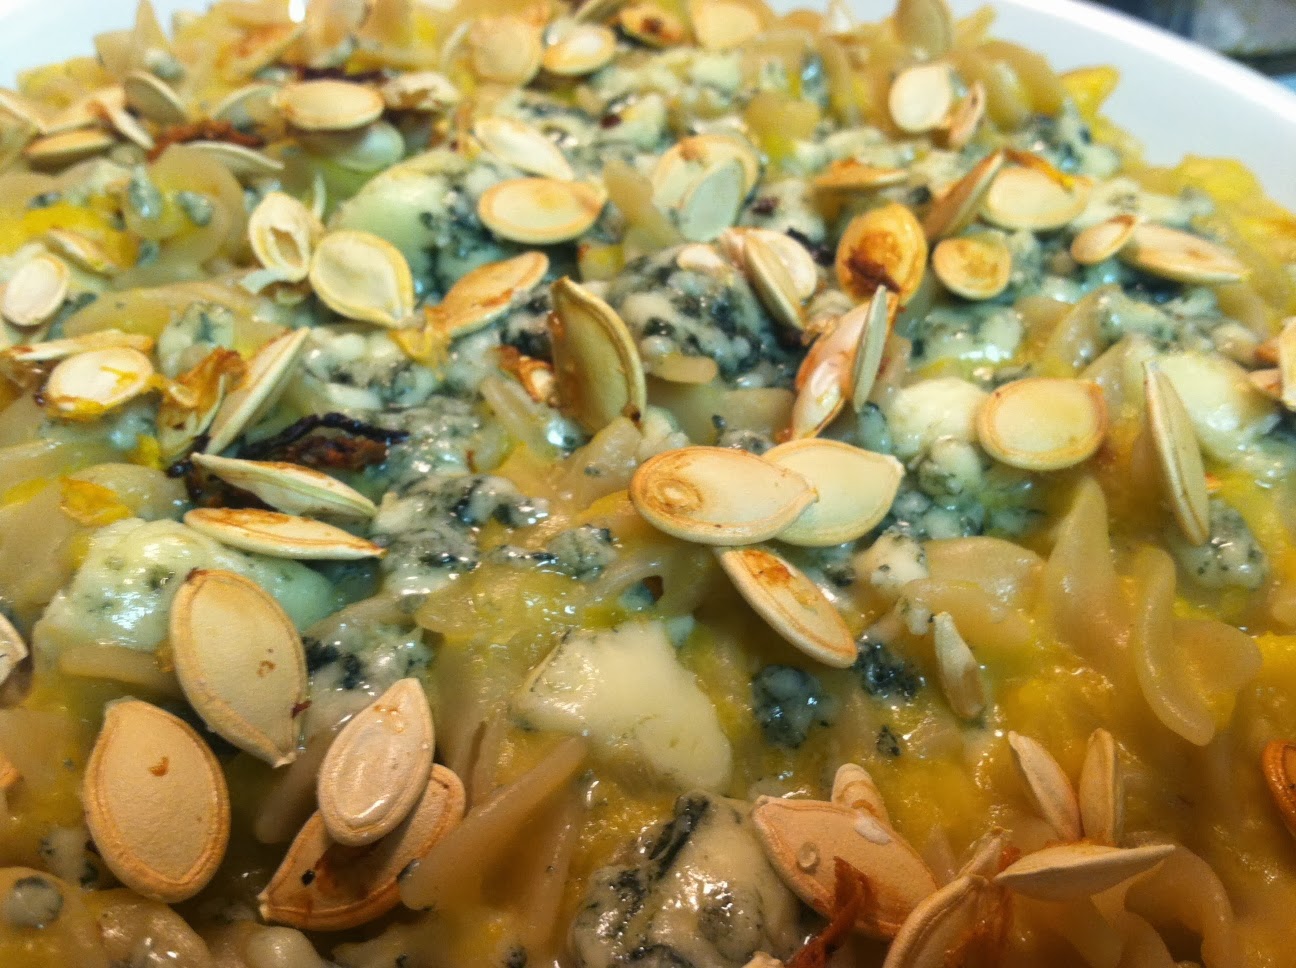
God, that's good stuff

So this recipe totally won me over. I may not have fallgasmed but pumpkin certainly has earned a spot in my culinary repertoire.  However if you see me with a pumpkin latte in my hand anytime between now and December 21st, feel free to kick me!


Monday, October 21, 2013

Who Needs Carvel? Make Your Own Ice Cream Cupcakes!

Not that Carville!


In the gluten free world, good cakes are hard to come by. Yes, I am well aware that a lot of mainstream cake mix brands are now churning out GF cake mixes and I sincerely appreciate the effort. Actually, for my last birthday Andre made me a yellow cake from the King Arthur brand. It was so tasty that I ate it for breakfast for three days straight. Best breakfast you shouldn't be eating! However, GF cakes are still pretty crumbly and the texture is somewhat off from the gluten filled varieties.  Piggy-backing on the theme of my last post in which I told you that my sister is basically a gluten free saint, for her birthday last week, she decided to forgo a traditional birthday cake this year and instead let me try out a new recipe for none other than GF Ice Cream Cupcakes!


You devil you


I fracken love ice cream cakes and despite being made of ice cream they are not gluten free because of the crunchy bottom layer made from chocolate cookie crumbs. Damn you Carvel! Well I figured that it would be pretty easy to make a gluten free version. Plus, sometimes it's just better to have a cupcake. Single serving. All to yourself. Cupcakes rule.  All I needed to de-glutenify this recipe was gluten free chocolate sandwich cookies. I know Trader Joe's has a GF version of their Joe's Os now. But I actually opted for a brand I found at Shaw's - actually one of my favorite GF brands (and the most ridiculous to spell. But it's Canadian, so I'll cut them some slack.) called Kinnikinnick. Despite these Oreo-like cookies coming in at a whopping $6 a package, they made a perfect ice cream cupcake crust.

Now, for the ice cream portion of the cupcakes you have a lot of GF options to choose from. Barring any ice creams that contain cake pieces, brownie pieces, or cookies pieces, I would say most ice cream is gluten free. But always check the label just to be sure.  Now for Andre's birthday cupcakes, I decided to crank up the difficulty factor and do a Neapolitan version.  For some reason, Neapolitan ice cream is a new favorite in the Dumas household. The three flavor combo is just the best of three worlds to both of us and while years ago I would have absolutely died if you tried to make me eat strawberry ice cream, now I kind of love it!

All in all these are a pretty easy, no bake dessert option. I made it about 10 times harder by doing a Neapolitan version, but if you used just one flavor of ice cream the process is super simple.   So...onward Christian solider!

Neapolitan Ice Cream Cupcakes


You will need:

Package of GF chocolate sandwich cookies - I used about 6 to 8 cookies to make 6 ice cream cupcakes. You can average about 1 cookie per crust. 
2T of melted butter
ice cream 
icing (optional)

Start by crushing GF cookies in a mixing bowl. I don't currently own a food processor, but man that would have been handy. However, I ended up using my potato masher and after a great upper body workout, my cookies were crushed!

Then add melted butter and combine.  Cookies should be to the consistency that when you press them down that they hold together. 

Fill cupcake pan with cupcake liners and press cookies into each liner up to about a half of an inch.  


Remove ice cream from freezer and soften for a few minutes.  You can also speed up the process by scooping out the ice cream and manically stirring it till it is the consistency of soft serve ice cream. That's the route I chose. I have patience problems no doubt.  Spoon softened ice cream into cups and then spread into an even layer. Place back into freezer (about 10 minutes or so) to harden and then you can add some icing if you want to.  


Make your own soft serve ice cream!


Now for this Neapolitan version, I had to make three separate layers - one chocolate, one vanilla, and one strawberry. So what I did was cut out each flavor from the carton and do the whole melting thing one flavor at a time. You'll need to make sure the previous flavor has stiffened up enough in the freezer that you can build the next layer on top. This takes some extra time but left me with that cool layered effect and the possibility of getting one bite where all flavors were represented. Amazing! 

Originally I wanted to try out the cool new Cool Whip Icing that is currently out now, but I had a senior moment at the grocery store and totally forgot it.  So I ended up just using traditional cake frosting and it was pretty tasty.  Next go round I'm definitely going to give the Cool Whip a whirl. 


Be prepared to eat these little delights real fast, as they tend to melt really quickly.  But they were insanely delicious and a great way to ring in Andre's 27 years.

For my next post, bring on the sweaters and boots. It's officially fall and everyone has gone pumpkin crazy, including me. I'll be tackling Pumpkin Mac and Cheese.   

Wednesday, October 16, 2013

Party Time, Excellent


This past weekend I was busy putting together a menu for my lovely sister's 27th birthday. Since I was a little short on dough for a really fancy, expensive dinner and Andre isn't much into loud, birthday bar crawls, I thought the best way to celebrate her 27 years of existence would be to compile a birthday feast that would highlight some of her favorite foods. While Andre does not have celiac disease, she very sweetly will eat all of my gluten free creations. If you ever have doubts that gluten free cooking can be delicious, just give her a call. She's one of my greatest gluten free champions and has been such a good sport at trying all my various creations. So thank you Andre!

Now as luck would have it, poor little Andre was sick this weekend. I blame this on the see-sawing phenomenon that we now call the weather. 80 degrees one day, 55 the next. So cruel Mother Nature, so cruel.  Since the birthday girl spent most of the weekend napping and could barely taste or smell anything, I decided to abridge the 5 course menu I had planned and focus on a few apps, some soup, and the piece de resistance - dessert!

So for today's Party Time theme I'll first be focusing on these tantalizing One Bite Shrimp and Grits. Later this week.......Neapolitan Ice Cream Cupcakes!

One Bite Shrimp and Grits


When I started menu planning, I knew I had to incorporate Shrimp and Grits into the menu somehow. Not only has Shrimp and Grits really been making a comeback but it is one of the top five things that I make that Andre truly adores. So I attempted this "mini" version.  I called it one bite but I have to be honest - it ended 
up being quite the mouthful of grits. So it's totally excusable if you find you have to take a fork and knife to these suckers. You will need:

Mini muffin pan
3/4 c Grits
Evaporated Milk (12 oz can)
Water
1/2 cup shredded cheese
4 or 5 strips thick cut bacon
20-30 medium shrimps
Old Bay Seasoning

Grits

I like to buy the Quaker grits. They are cheap and convenient and cook up quite fast. Here's a little secret when making grits. Use 2 parts evaporated milk to 1 part water. Make sure you get evaporated milk and not sweetened condensed milk. I always confuse the two. (Sweetened condensed is super sweet and thick and would be disastrous in a savory dish like this one!) This makes them really creamy and then you don't have to load them up with too much cheese.  

Combine 1 cup water and 2 cups evaporated milk in a large saucepan and bring to a boil. Add grits and reduce head to medium so that grits are simmering not boiling.  Start whisking and keep whisking until grits starts to gain some heft. When they start pulling away from the sides of the pan (3-5 minutes) remove from heat and add some shredded cheese (1/2 cup) and pepper. Salt to taste.  Using two small spoons (like you would for cookie dough) scoop grits into mini muffin pan and let set for 30 minutes. Once they have completely cooled, remove from pan and set aside. 

Shrimps

Peel shrimps and set into bowl. Drizzle a tiny bit of olive oil (1 T) onto shrimps. Sprinkle on Old Baby Seasoning liberally - make sure shrimps are coated and then massage spice into them. Old Spice has a really kick to it, so be liberal but don't go nuts. 

Cut bacon into chunks and crisp in skillet. Remove with slotted spoon and place on plate covered with paper towel. Pour out all but 1 T of bacon grease. 

Reheat pan with one T grease and add shrimp. Cook until pink and cooked through 3 minutes or so. Remove from heat. Once cooled, lay shrimps flat and cut in half so you have two flat pieces per one shrimp.

Reheat your grit cups in 300 degree oven for a few minutes to warm through.  Remove from oven and top with one flat piece of shrimp and one shard of bacon. 


I thought these came out excellent and Andre did too. We polished off almost 10 each! Hey, let's remember  - this was basically our dinner....plus about 3 other things! From these pictures, you can tell I add a little sauce with red peppers. I wasn't too thrilled with it.  I didn't think it added anything and it added an extra step, no I nixed it from this recipe. I think the Old Bay is all the season you need for these.

So have a party, make some one bite shrimp and grits, and invite me over!

Next post, I conquer the uncharted territory (at least for me) of ice cream cupcakes!


Thursday, October 10, 2013

Getting the Band Back Together


Well it's official. I'm back. Back again. Emily is back. Tell a friend.  No, seriously tell a friend. Tell lots of friends.

My last post was literally a year and six months ago. Wow. In that time a few things have happened and sadly none of them involve winning the lottery or meeting Dick Van Dyke, which were the only things I thought could truly put this blog on the bench. But let's see. Since I last wrote a post I have turned 30 (yee-haw!), hiked 100 miles in Scotland, and bought several pairs of cropped pants in multiple colors and prints. Phew. Talk about crossing things off my bucket list!

In more important, blog related news, I reached my 10 year Celiac birthday in June of 2012. What a time to be a Celiac! If you would have told me 10 years ago that there would be restaurants with gluten free menus, a whole aisle dedicated to gluten free foods at the grocery store, and countless articles in magazines from Vogue to Allure on the benefits of going gluten free, I would have slapped you in the face and called you crazy.  But we live in a different world now. My pool of gluten free allies has grown ten-fold. Now, not only do I have a standing gluten free dinner with some of my non-gluten free friends, but people are popping out of the woodwork right and left with either full blown Celiac Disease or a want to eliminate gluten from their diets to alleviate various health problems. My best friend (who lives in Germany - Gutentag Rebe!) was just diagnosed with Celiac a few months ago. Hell, my mom even eats a gluten free diet now! These days you can't even throw an overpriced, cardboard tasting, crumbly piece of gluten free bread without hitting someone who is gluten free. What a world, what a world!

So I took this all as a sign that I need to get back out there, back out there spreading my certified gluten free oats if you will. So you'll notice I jazzed up my blog design a little bit. Isn't the multi-colored flatware much more inviting? I'm also going to try to stream-line my recipes. I'm shooting for less anecdotes about my cat (love you April!) and more food, food, food.  With that said, on with the show!

Today's recipe is..........Veggie Lover's Spaghetti and Meatballs! 


Now upon first reading that title you might think I'm absolutely nuts. I mean she puts carrots in her meatballs? Sacrilege! And while on some days I certainly am pretty nuts (just ask my roommate/sister) this recipe is as sane as it gets! On Fridays there is a farmer's market in Copley Square and I thank my lucky stars every day that I work right nearby.  This past Friday I got a whole smorgasbord of veggies. Now, I'll admit, normally I would not use all of these together. However, recently there's been a serious dearth of vegetables in my life. Last week, I was just so happy to have some produce in my house for once that I went a little bit overboard with this recipe.  I got one giant spaghetti squash, a large head of kale, fingerling potatoes, broccoli crowns, and a nice head of cauliflower.  I had planned on using some leftover pasta and tomato sauce I had frozen last week to make a really exciting Friday night leftovers dinner. Meh, no.  But now that I had a plethora of veggies at my finger tips, I decided to go whole hog. This recipe is going to be a bit willy nilly and I'm going to somewhat briefly explain the steps . So hang in there.  I would describe my style of cooking as - "what else can I throw into this to make this taste better?!?" - and that's basically what I did here. Of course if you're a true veggie lover, you can leave out the meatballs and it will be just a really great faux pasta with lots of veggies kind of a thang.

Things you'll need

Veggies

Spaghetti Squash
Kale
Broccoli
Oil
Salt and Pepper
Garlic - a few cloves minced

Meatballs

Ground beef, turkey, veal, or pork 1 lb
Onion  - 1/2  of one chopped
Garlic - a couple cloves, minced
Carrot - peeled and cut into tiny pieces
Worcestershire Sauce - a few (Harlem?) shakes
Mayo - 1 T
Dijon Mustard - 1T
Smashed up tortilla or potato chips [put a few chips in a bag and smash 'em up]
Salt and Pepper

Sauce

Butter -1T
GF flour - 1T
Milk - 1.5 c
Garlic - 2 cloves, minced
Chicken Stock - a 1/2 cup [optional]


First - prep and roast your spaghetti squash.  There are couple of ways of doing this. You can either use a microwave or an oven and you can cut the squash or not. It's a free for all basically! If you have the time I suggest just halving it, sprinkling it with olive oil, salt, pepper, and putting it on a cookie sheet cut side up. Roast for 45 minutes in a 350 degree oven and remove. Let cool for a few minutes and then rake a fork across flesh to create your "spaghetti".  Set aside.

Next, make your meatballs.  Throw ingredients listed above in bowl and combine with hands.  Roll meat into mini meatballs. I found the best way to make gluten free meatballs is to always follow three rules. One: Make them mini. Two: Bake them in mini muffin pans. You can even use regular muffin tins and just put a few meatballs per cup. Three: Use crushed up GF chips as a binder. While traditional meatballs use breadcrumbs, I've found that a good GF switch is to use either crushed potato or tortilla chips. It binds the meatballs but also ensures they remain succulent. Trust me. These techniques will change your meatball lovin' life. Stick into oven while spaghetti squash is cooking  and cook for about 10 minutes until no longer pink yet still moist.  Remove from oven.

Then make your veggies. I roasted the broccoli by cutting my head of broccoli into smaller chunks. I placed them in a bowl and added a bit of oil, salt, and pepper and tossed to coat. Next, spread broccoli on cookie sheet and bake in oven with spaghetti squash and meatballs. Make sure you stir the pieces around every few minutes because broccoli tends to stick to the cookie sheet and get a little burned. Keep an eye on it - probably only 5-7 minutes or so.

Cut kale leaves from backbones.  I like to do this because the backbones tend to be a little bit tough to chew. Chop leaves and rinse with cold water.  Put a little bit of oil in a pan and add your kale leaves. Saute for a few minutes till they reduce in size. Like spinach, you'll start with a lot of kale but once you lose some of the water from the leaves the amount will shrink. After a few minutes add some chopped garlic, salt, and pepper. Stir to coat and cook another minute or so, then remove from heat.  I always add the garlic at the end because the hot pan tends to scorch it if you add it at the beginning.

Last but not least - the sauce.  You can use any sauce you want with this. A homemade tomato would probably be stellar.  I opted for a garlic cream sauce.  I did this by doing the following. Melt better in pan. Add 1 T of GF flour to make a roux. Mix for 30 seconds, then add milk and chopped garlic, whisking as you pour in the milk.  Continue to whisk and bring to a simmer but do not let it boil over.  At this point, sauce should start to thicken. If sauce can coat the back of a spoon, you're good to go. If too thick add some chicken or veggie stock to thin it out. If you want it more cheesy, throw in some cheese at the end. Fontina melts well and adds a nice richness. Gorgonzola or blue cheese would add a tangy zip!

Finally....assemble! Add hot sauce to spaghetti squash that you set aside.  Place into large bowl.  Top with your roasted broccoli, kale, and veggie lover's meatballs.

Reviews from my sister - "Wow, this tastes just like pasta!".  Mission complete!